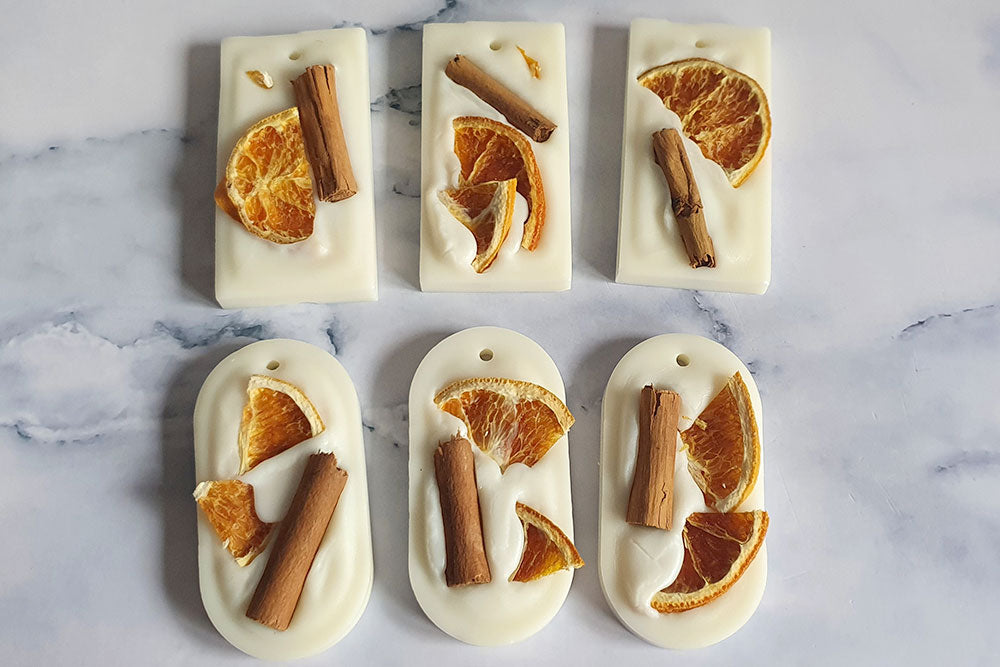
How to Make Hanging Wax Fresheners - the perfect last minute Christmas gift!
We’re going to show you just how easy it is to make your own scented hanging wax fresheners for this upcoming festive season using traditional Cinnamon Orange fragrance oil along with dried orange slices and cinnamon bark for the perfect decoration or used as a scent freshener for your home.

Hanging wax fresheners are a great way to fragrance the inside of wardrobes, linen closets and drawers or anywhere that doesn’t get a lot of daylight and could be prone to musty odours. They also make perfect stocking stuffer gifts, Secret Santa treats or even tree decorations so if you’re struggling for a last minute Christmas gift idea, look no further.
If you’ve never made wax melts before or are fairly new to making them, you may find our beginners tutorial on How to Make Wax Melts in Moulds very useful for showing you the basics. If you’re ready to jump straight into making these wonderful hanging fresheners, read on for a step-by-step tutorial or check out our video above if you prefer a visual learning approach.
Difficulty: Beginner/Intermediate
Makes: 6 x Hanging Wax Fresheners
Ingredients

- 156.4g EcoSoya Soy Blend Pillar Wax
- 13.6g Cinnamon Orange Fragrance Oil
- 2-3 Dried Orange Slices
- 3-4 Sticks of Cinnamon Bark
Materials Needed

- 6 Cell Hanging Wax Tablet Silicone Mould
- Digital weighing scales
- Milk or digital thermometer
- Metal spoon
- Melting pot & pan (or double boiler)
- Twine or Ribbon for hanging
- Kitchen roll to protect your work surface
- Nitrile gloves (or similar protective gloves) and an apron. We’d also highly recommend the use of a chemical mask
Top tip: Before starting, make sure your work surface is covered and you’re wearing the correct PPE as stated in the materials needed above. This is to avoid skin/respiratory irritation from the fragrance oil and to protect your clothes from any splashes.
Step 1 – Preparing the orange slices and cinnamon bark

Roughly (and carefully) chop up 2-3 dried orange slices with a sharp knife. Next, snap or carefully cut 3-4 cinnamon bark sticks in half.
Set to one side until needed.
Step 2 – Weigh out the wax

Place the melting pot on your scales and turn on. Weigh out 156.4g of wax.
Step 3 – Melt the wax

Half fill your pan with cold water and place on your cooker/stove top. Sit the melting pot on top of the pan. Turn the hob/ring on and set to a medium - low heat. This is called the double-boiling method.
Top tip: The water in your pan should be no more than halfway up your melting pots bowl.

When the wax starts to melt, place the thermometer in the wax to check the temperature. Once the wax has fully melted and reaches 70-75 degrees Celsius, take the pan off the heat and turn the hob off.
Top tip: Don’t leave your thermometer in the melting pot whilst the wax is melting as it will get hot from the steam. Keep adding the thermometer to the wax at melting intervals to check it's not getting too hot.
Step 4 – Add Fragrance Oil

Once the wax reaches 63-65 degrees Celsius, place the melting pot on the scales, turn on and add 13.6g of Cinnamon Orange fragrance oil. Stir continuously for around 90 seconds to ensure the fragrance oil is thoroughly mixed into the wax.
Step 5 – Pour the wax into the mould

Once stirred, allow the wax to reach 60 degrees Celsius (usually straight after stirring). Once the wax has reached this temperature you can start to fill each cell of the mould, being careful to not overfill them.
Step 6 – Add the dried orange slices and cinnamon bark

Once the wax starts setting (turning into a solid wax block), take the dried orange slices and cinnamon bark sticks and place them on top of the wax.

Be careful to not push down too hard as you’ll want them to stay as close to the surface as possible.

The fresheners don’t need to be identical in look, so have a play around placing the orange slices and cinnamon bark in different places.
Step 7 – Add the twine/ribbon

Allow the wax to set fully, usually around 2 hours. Once set, remove each wax block from the mould, being careful around the hanging hole. If the wax has covered the hanging hole at all, use a metal skewer or cocktail stick to poke the hole back through.

Take some lengths of twine and ribbon, threading each one through the hanging hole of the wax block.
Your hanging fresheners are now made and can be used right away.
How to Use Your Hanging Wax Freshener

Wow your family and friends this Christmas with a truly wonderful scented handmade gift. You can even hang these on your Christmas tree, the wonderfully festive fragrance releasing throughout your room.
After the festive season, you can place the hanging fresheners in cool, dry areas away from damp, moisture, heat or direct light. These are fantastic to hang inside of a wardrobe or linen closet or tucked into drawers for a vibrant scent every time they are opened.
When using, you may want to take care when hanging in wardrobes or placing in drawers. We'd recommend not placing the wax fresheners directly in contact with clothing or fabrics as the wax and fragrance oil may transfer and cause staining.
What To Do Once Your Hanger Has Lost Its Scent

Once the freshener has lost its scent, simply break up chunks of the block and pop it in your wax melt burner. You’ll really get the best out of the fragrance this way!
Due to their size, we'd recommend removing the dried orange slices and cinnamon bark before placing in your burner.

Why not have a look at our wide selection of fragrance oils and botanicals as well as our wax melt waxes to decide which you’d like to use for your next hanging scented wax freshener making project?
Looking to sell your hanging scented wax fresheners or not sure what else you need in order to gift your creations? Take a look at our Ultimate Guide to Selling Your Handmade Candles and Wax Melt for further information.


5 Comments
Hi can I use ecosoy wax to make these or does it have to be pillar
Can I use paraffin wax too or is it just soy wax?
And will you be able to also hang them in cars?
Hi Althea, Unfortunately, we don’t currently carry moulds but it’s something we’re looking at stocking in the future so we appreciate your feedback! The mould you see here was purchased from Amazon if that helps! Kimberly – Craftovator
This looks amazing and I would love to make them. Only thing is that I don’t see the hanging wax moulds on this website – it would be great if we could but all of the materials here :(
Leave a comment
All blog comments are checked prior to publishing