


Christmas Soap DIY: Sparkly Snowflake Layered Soap Bars using Melt & Pour Base
Want to learn how to make your own Christmas and Winter themed soap bars? Our tutorial today will show you how easy it is to give your homemade melt and pour soaps a lift with a decorative embed and how to easily layer your soap for a wonderful two-toned effect.

For so many of us, Christmas is a time of joy and happiness. Spending time with loved ones, being cosy indoors in front of the Christmas tree and of course, there’s the gift-giving. Making your own soaps and other handmade gifts can save money but it’s the satisfaction of seeing others enjoy your products that is incredibly rewarding!
Our Sparkly Snowflake Layered Soap bars use a mix of both clear and white melt & pour soap base to create a wonderful layered effect as well as using snowflake embeds to enhance the look of your soaps. This fun wintery look and feel is only made more enticing using our Sparkly Snow fragrance oil - a mix of festive herbal scents with a hint of citrus resting on a woody base.
For our more experienced makers, our video below is ready to view or read on for a more detailed written tutorial including images of each step.
However, this is an intermediate tutorial so if you’re new to melt and pour soap making, we’d encourage you to start here: How to Make Melt & Pour Soap – The Ultimate Beginner’s Guide, where you’ll find all the information you’ll need to start practicing before moving on to the more advanced techniques shown here.
Our tutorial is meant for personal use only. If you’d like to sell your soap products, you’ll need to purchase our Melt & Pour Soap Assessment and follow the guidelines on selling your bath and body products as laid out in our blog post here.
Difficulty Level: Intermediate
Makes: 4 x 100g soap bars
Ingredients

- 270g SLS Free Melt & Pour Base
- 135g WSLS Free Melt & Pour Base
- ~50g additional WSLS Free Melt & Pour Base (for the snowflakes)
- 1g Electric Blue Mica Powder
- 12g Sparkly Snow Fragrance Oil
- Isopropyl alcohol
All our ingredients for this tutorial are covered under Melt & Pour Soap - Seasonal Assessment.
Equipment

- Microwave or double boiler/saucepan
- Kitchen weighing scales
- Thermometer
- Sharp knife
- Spatulas
- Single cell soap bar mould
- 2 heat proof jugs
- Small pot for mica powder & fragrance oil
- Cling film wrap
- Snowflake cutter
- Spray bottle (for isopropyl alcohol)
Step 1 - Measure out all of your ingredients

Prepare all your ingredients before hand by chopping the base into equal cubes and weighing out your other ingredients into separate tubs. Be sure to leave some of the white soap base aside for the next step.
Step 2 – Prepare Your Snowflake Embeds

Thinly slice your spare white melt and pour base. As we are not scenting the snowflake embeds for this tutorial, it can be sliced straight from the tub. Slice the soap thinly into a 3-4mm thickness.
Three snowflakes will fit on each of our soap bars but you can adjust the number dependant on the size of mould and the snowflake cutter that you will be using. For 4 of our moulds, we cut 12 snowflakes. Once you’ve cut these, set to one side.
Step 3 – Melt the First Layer (Clear Base)

As this soap is being made with a total of 3 layers, take 135g of the clear soap base (half the full amount of the clear base) and cover with clingfilm.

Melt on short bursts in the microwave or melt in a glass bowl over a saucepan of boiling water (double boiler method) until your soap base reaches approximately 65°C.
Step 4 – Mix Half the Mica into the Melted Clear Base
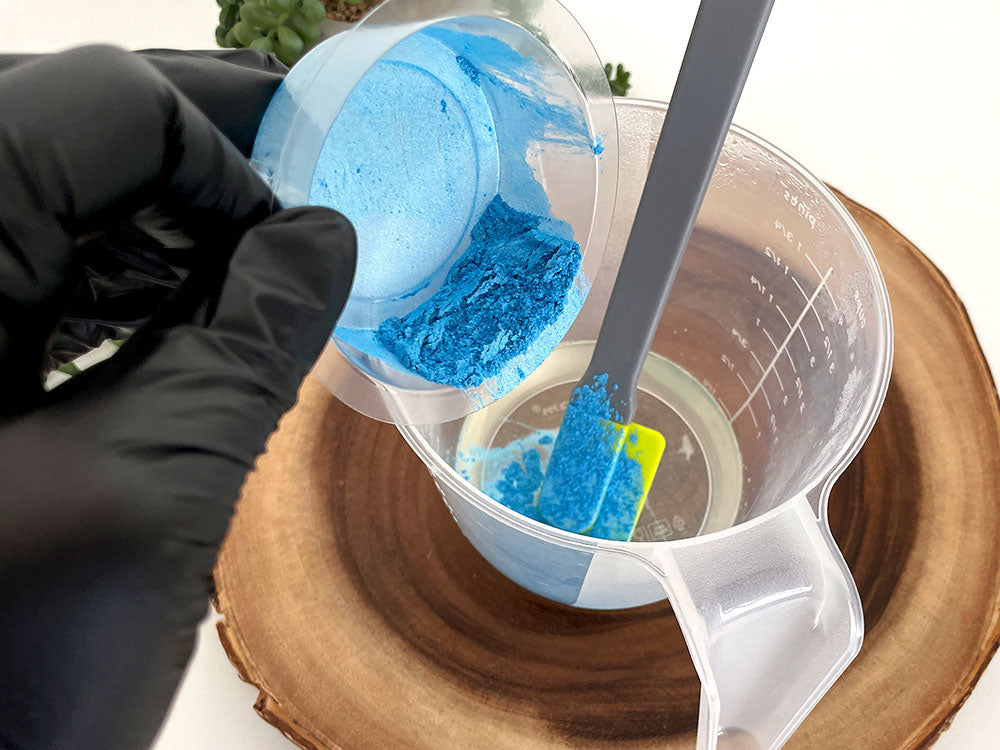
Take your mica powder and place half of it into the clear soap base. Keep the other half for the last blue layer later.

A spray or two of isopropyl alcohol will help disperse any mica powder clumps and stop a skin from forming.
Step 5 – Add the Fragrance

Add 4g of Sparkly Snow fragrance oil to this melted base. Stir to fully combine.
The soap base cools quickly after the fragrance has been added so a couple of sprays of ipopropyl alcohol should prevent a skin from forming.
Step 6 – Pour Your First Layer

Pour a thin layer (around 1/3 the depth of the mould) of your soap mixture into each of the 4 cells.

After pouring, spray with isopropyl alcohol to disperse any bubbles. Pic 9
Step 7 – Melt Your Second Layer (White Base)

Wait for the first layer to form a skin - this won’t take long as the layer is very thin. Now take the 135g of white soap base, cover with clingfilm and melt until it reaches approximately 65°C.
Step 8 – Add the Fragrance Oil

Add 4g of Sparkly Snow Fragrance Oil to the melted white soap base and stir until fully combined. Keep the base covered in the clingfilm until the soap has cooled to down to just under 60°C. The second layer needs to be on the cooler side as it could melt the first layer if poured too hot.
Step 9 – Spray The First Layer & Pour Your Second Layer

Spray your first blue layers with a liberal amount of isopropyl alcohol. This will help activate the glycerine and help this second layer stick.

Now pour the white soap base equally over the first 4 layers. Spay with isopropyl alcohol to disperse any bubbles. You should now have 4 cells, each filled 2/3rds of the way up.
Step 10 – Melt Your Third Layer (Clear Base)

Once a thick skin has formed on your second layer you are now able to prepare your last layer. Take the last half of your clear soap base, cover with clingfilm and melt to approximately 65°C.
Step 11 – Add The Last Half of Your Mica Powder

Once melted, add the last of the electric blue mica powder and stir to combine.

A spray of isopropyl alcohol will help disperse any mica clumps.
Step 12 – Add the Fragrance Oil

Now add the last 4g of sparkly snow fragrance oil. Stir to combine. Keep covered until the melted base is just below 60°C.
Step 13 – Spray the Second Layer & Pour Your Third Layer

Liberally spray your second layer with isopropyl alcohol.

Pour on your 3rd and final layer until you have filled the mould. Spray isopropyl alcohol to disperse any bubbles.
Step 14 – Add the Snowflake Embeds

Once a firm layer has formed on the soap you can now add the snowflake embeds to the top. Start by spraying liberally with isopropyl alcohol.

Place your snowflakes on top of the soap bars. When placing them on top, make sure the alcohol has not evaporated as it is the alcohol that will make the stick.

Once all have been placed on the soap spray a little more alcohol over the top.
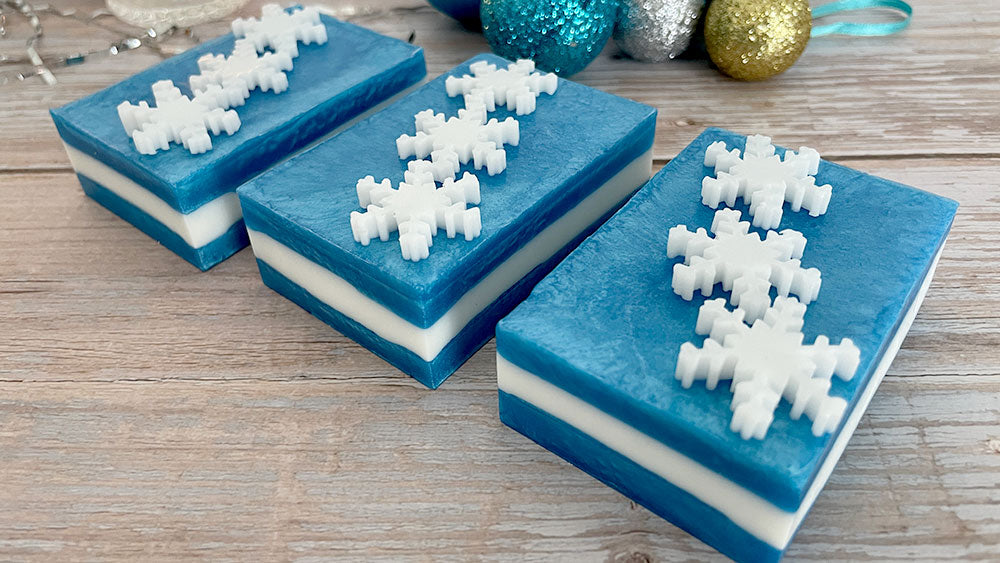
Once the alcohol has fully evaporated and the soap has completely cooled you can then carefully unmould your soap bars.